White Arkitekter
FullstackTypeScriptNext.jsTailwindThree.jsNode.jsPython
An SPA to interact with a backend application that predicts the daylight in a building.
#Description
White Arkitekter is a Swedish architecture firm that wanted to create a Proof of Concept for a new product that would help architects to estimate the daylight in a building.
Daylight is required by law in many countries, and a complete simulation is required to comply with the law. That simulation is complex, slow, and costly.
White Arkitekter's R&D department had been working on an algorithm that would be able to perform a quick estimation of the daylight in a building, so architects could quickly iterate on their designs. That would allow them to perform a complete simulation only when the project was ready, decreasing costs and time to market.
They had implemented the algorithm using Grasshopper –a node-based coding plugin for Rhino–, and wanted to add a web interface to allow anyone with a 3DM model to use it, without having to install Rhino or Grasshopper.
#Overview
There are two backends and one frontend parts. White Arkitekter provided the Rhino backend, and I wrote both the intermediate Node.js backend and the frontend. I also gave some support to optimize custom Python code in the Rhino backend.

The intermediate backend is written in Node.js. It receives models from the frontend and process them for the Rhino backend to work properly. It also process the results from the Rhino backend to be compatible with Three.js.
The frontend uses TypeScript, React, React Three Fiber, and Tailwind. The application allows the user to upload a model. With that model the UI is updated so the user can add relevant information for the simulation. Once the information is added, they can submit the model and information to be processed. Once the results are received, they are shown in the same application.
#How it works
In the initial view, you can click on the plus sign besides the "models" section to upload a new model. The dialog to select the .3dm file opens and the file can be selected. In the demo version you'll get a model already uploaded.

Once the model is uploaded, it's shown in the main section and it's sent to the Rhino server to be analyzed. The estimation algorithm expects some specific geometries for different parts of the building (floors, windows, etc.). This initial step analyzes each layer based on its type, and returns the amount of valid objects found for each layer. An example of an invalid geometry would be a window made by an open path, where the path is expected to be closed.
The Objects summary window shows up with information about this first analysis. In the demo those results are precomputed, and a delay is added simulating the response time of the Intermediate and Rhino servers.
The Models section will have the a list of models uploaded. So far only one model is shown.
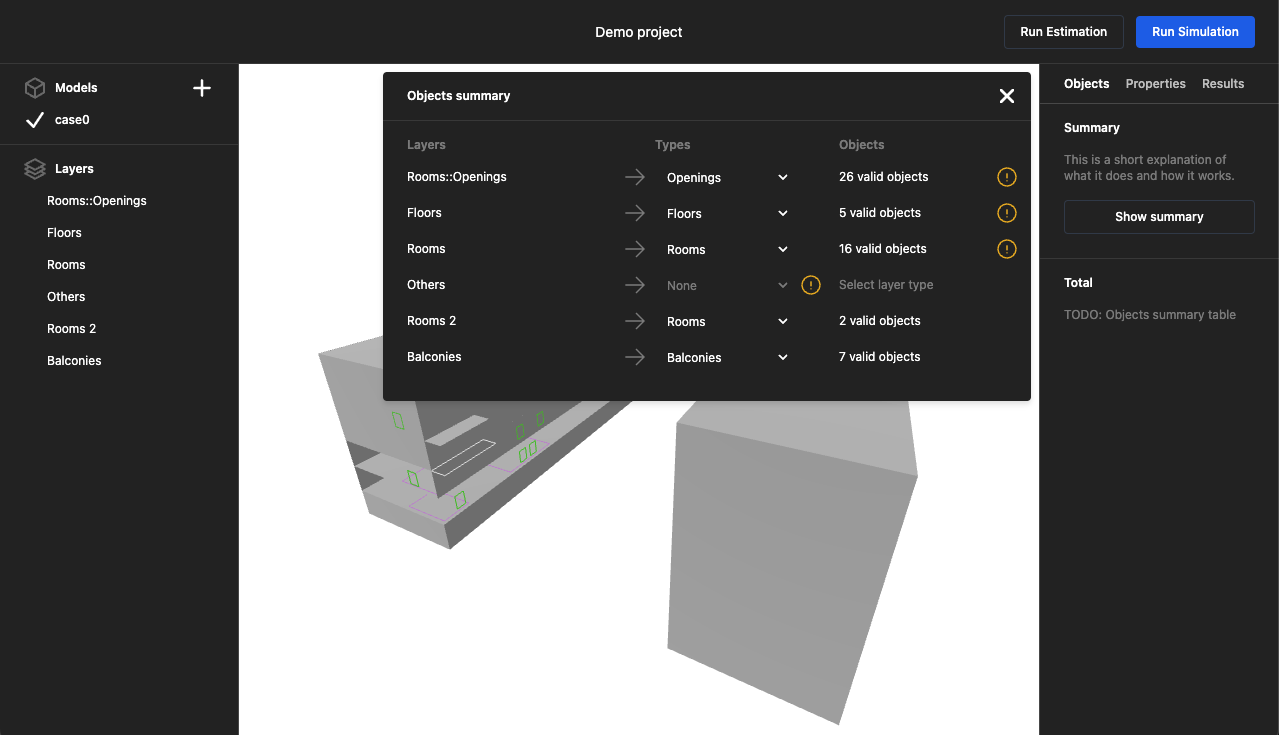
The Layers section will show each layer of the model in a list. When you click on one layer, the 3D of that layer is shown in the main view. The rest of the layers get some transparency so the selected layer is easier to see. In red you can see the objects from the uploaded layer, and in green the objects from the processed layer.
Selecting a layer also shows the properties tab in the right hand side panel. There you can see relevant information, as well as set some properties that are necessary for the daylight simulation.
At this point an estimation can be computed. The difference between estimations and simulations is that an estimation is an automated process to get a quick but not very precise result, whereas the simulation is a longer process that is compliant with Swedish regulations and involves a review by an architect.
Clicking on the button to run estimation would start the request, and show the results tab in the right hand side panel.
Once the results are ready, they'll show up overlaid on top of the model, visually showing the estimated results for different rooms in the building. Each of those rooms is clickable, and on click you can see some text with information about the result and how to improve it.

Feel free to give it a try in the interactive demo.
Back to home